Cut Faux Custom Acrylics with Silhouette CAMEO (Life Changing!)
Since the Silhouette cutting machines can't cut actual acrylic the secret is...Shrinky Dinks[1].
Shrinky Dinks come as thin sheets so they can be cut with Silhouette CAMEO or Portrait, but once they're baked quickly in the oven, they harden and expand to about 9x their original thickness. That gives them an acrylic-like feel!
The directions on the Shrinky Dinks packaging[2] suggest to paint, stamp or color with markers before baking and use them for small charms or the like. BUT..this girl right here doesn't follow directions...or maybe it's just that I like to push the envelope...and what I discovered is baking them blank, results in a faux acrylic that is then ready for vinyl! Hello! Mind blown!
So how do you do cut Shrinky Dinks with Silhouette CAMEO to make your own DIY custom blank acrylics?
Let me teach you may ways. I am using a silhouette of my daughter, which I created in Silhouette Studio[3], for this example.
The first thing you want to do is open up your design in Silhouette Studio. Decide how big you want the finished faux acrylic to be. I wanted mine about 2x2" so I sized to those dimensions. If you are making a charm or a key chain or an acrylic Christmas ornament, you'll want to use the Draw a Circle tool to add circle for the key chain, hook or hanger to go through.
Since Shrinky Dinks material[4] shrinks significantly you need to cut a much larger design...something about 3x larger. The easiest way to do this is to select your entire design by clicking on it and from the Scale tool click "300%".
Keep in mind Shrinky Dink sheets[5] are only 8.5 x 11" so you'll want to make sure the enlarged design can fit on a sheet.
Place the cut design on a piece of foil on a baking sheet and bake at 325 for 1-3 minutes. Watch the Shrinky Dinks curl up, shrink and then flatten back out. After it flattens let it bake for another 30 seconds or so.
Once it's completely flat, remove it from the oven.
As you can see you've essentially created something like an acrylic! Now...you can leave your blank like this, but why would you do that when you can add vinyl?! I mean they don't say Vinyl All The Things for nothin'.
To cut the perfect size vinyl for your shape you'll need to use your Silhouette Pixscan mat[7].
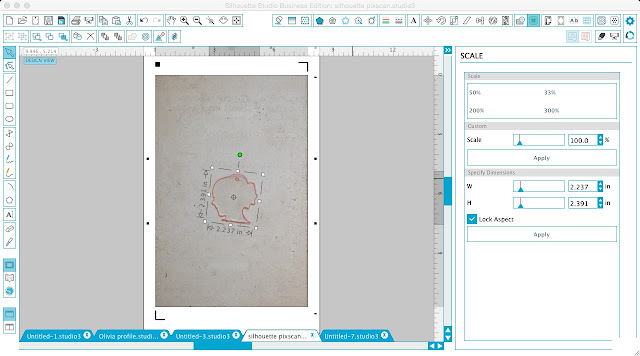
Place your faux acrylic on your Pixscan mat. Take a picture of the entire mat and email it to yourself. (Don't worry that it's clear and hard to see on the mat or if you have a slight shadow). Open the Pixscan image in Silhouette Studio.
With the Pixscan image open in Silhouette Studio grab your original design and size it back down to the exact size of the acrylic on the Pixscan image.
Once you have the sizing correct, you are done with the Pixscan image. You can delete it - and just use the sized design to cut on vinyl.
I actually cut two - with on mirrored so I could put vinyl on both sides of my fake acrylic key chain.
And check out how thick this keychain is - like I said - just like acrylic only your Silhouette machine will actually cut it!
Note: This post may contain affiliate links. By clicking on them and purchasing products through my links, I receive a small commission. That's what helps fund Silhouette School so I can keep buying new Silhouette-related products to show you how to get the most out of your machine!
References
- ^ Shrinky Dinks (amzn.to)
- ^ Shrinky Dinks packaging (amzn.to)
- ^ silhouette of my daughter, which I created in Silhouette Studio (www.silhouetteschoolblog.com)
- ^ Shrinky Dinks material (amzn.to)
- ^ Shrinky Dink sheets (amzn.to)
- ^ cutting and weeding Shrinky Dinks material check out this Silhouette CAMEO tutorial (www.silhouetteschoolblog.com)
- ^ Silhouette Pixscan mat (amzn.to)
- ^ Subscribe Here (www.silhouetteschoolblog.com)
- ^ (www.silhouetteschoolebook.com)


